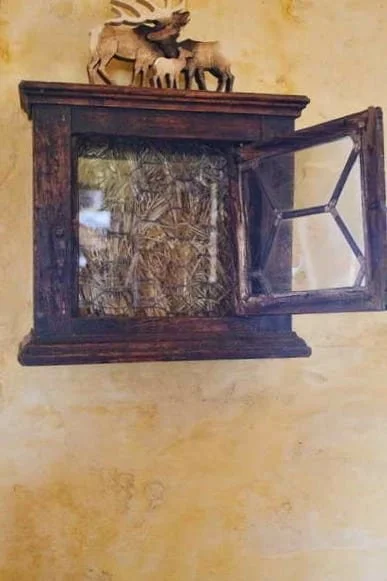
How to Build a Truth Window in a Straw Bale Home

Hand sculpted truth window in a straw bale house design-build by Timbo Scursso. Photo credit Straw Bale Home Designs.
A truth window is a feature in a straw bale house where people can view what’s behind the plaster. Truth windows often inspire conversations with curious visitors and are a trade tradition carried out in most straw bale houses.
Some are simple, and others elaborate. The style of the window is a reflection of the owner’s style and creativity. Most of the truth windows we have seen or created are simple and humble.
Often, it is no more than an open hole in the plaster. We don’t recommend this! It provides an easy pathway for moisture to enter your wall system — no good.
Building science shows us that air movement into and through a wall is a major problem. It lowers the efficiency of the wall and can introduce moisture that can cause damage.
We recommend using glass to create a beautiful window into your wall while maintaining the seal that protects your bales. Learn how in the step-by-step directions below.
Straw Bale House by Prairie Wind Architecture, p.c., Jeff Shelden, Architect.
Photo credit Lois Shelden.
Determining Location
First, where will you place it? Would you rather display it in a more “public” setting or a private location within your home?
Once you understand where it will be located, consider what you will see in the window. Position the opening so that the different components of the wall are displayed. Show the straw, wire mesh, twine, and other materials used.
What you likely DON’T want to show are spray-painted lines from the construction process! It’s common to spray paint the location of electrical wires and other components of the build onto the wall surface. Be sure that you know where the truth window will be installed before you start painting up the walls.
Although you can “erase” some of the spray paint if need be, it’s much better to know your location and avoid that area when marking up the walls.

Hexagonal truth window in a straw bale house design-build by Timbo Scursso. Photo credit Straw Bale Home Designs.
Step-by-Step Directions
Determine how big of an opening you want for your truth window.
Now cut that opening out of a piece of plywood such that you have 2-3″ of plywood around the opening. It should be like a picture frame, assuming a rectangular truth window.
Cover that frame with roofing felt to protect it from plaster contact
Carefully mark the location of the frame on the wall. Be sure not to overspray into the actual viewable area.
Use a chainsaw to cut out the shape of the “picture frame” to sit flush with the wall's surface once installed. Do NOT cut the area that will be seen once the truth window is complete. That area should stay at the same plane as the face of the wall.
Place the frame into the cutout and secure it with landscape pins. Make sure it is level and plumb.
Install the wall mesh as if the truth window doesn’t exist. Secure the mesh to the wall.
Check for level/plumb and secure the mesh to the picture frame with structural staples.
Carefully plaster over the picture frame and the rest of the wall, but leave the viewable area free of plaster. You’ll need to pay attention as you “cut in” to the edge of the open area so s to leave a clean line.
Create a finished truth window, either like the elaborate one shown above or a simple picture frame with glass.
Screw the finished frame to the previously installed “picture frame” backer.
Plug the screw holes on the finished frame.
Cut the finish plaster into the edges of the finished frame for a clean look.
If you’re a person who likes to see something done before trying it out on your own project, check out our How-to Video’s and Online Learning Resources, or join us at a Hands-on Workshop!
Bale on,
Timbo & Dainella