 I recently responded to an email about cracking in plaster. The person reported seeing cracks through all three coats of plaster along the joint between the top of the bales and the wood box beam. She has tried a lime wash patch, which made things worse or at least more noticeable, and she was asking what to do. My response is below.
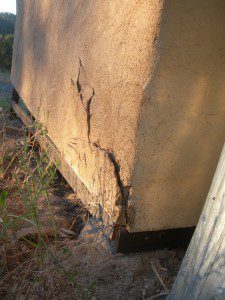
It sounds like the joint between the wood box beam and the plaster is opening up. This usually happens when the wood has not been separated from the plaster. In other words, if the wood was not covered with roofing felt, the plaster would be adhered to the wood. The problem here is that wood moves at a different rate than straw so you get stress fractures at the joint between them. Another potential problem is that the joint was not reinforced with plaster lath or some other structural mesh.
For the same reason stated above you need to span the joint with a structural mesh so that the plaster can hang on to that and the different rates of movement are absorbed and moderated by the mesh. The mixing ratio of the mud could definitely have an affect on things as well. My first assumption, not having seen or heard about the construction of the building, is that it is related to the items above, not the mixing ratio. If so, the only fix is to deal with the problem. If it is a lack of roofing felt, you may need to tear out the plaster and start over in that area.
Shy of such a drastic fix, you could try using fiberglass mesh tape (like drywall tape but get the higher quality plaster tape) placed over the crack and then embedded in fresh mud. This should give the plaster enough strength to withstand the movement of the plaster beneath it. I would certainly try that first.


12 Responses
How do I know if the plaster is cracking because of poor detailing or because of my plaster mix? What if it was just the ratio of sand to lime? You seem pretty sure in this posting that the problem is in the detailing, not the mix. How can you be sure?
Alan,
That is a great question. Sorry I wasn’t more detailed. The reason I think it is based in the construction detailing and not the plaster is that the crack seems to be very straight. Plaster born cracks are usually random and spread out like spider webs where as cracks born from poor detailing tends to follow the line of the sub straight or joint in question. That is what we are seeing in this situation: a straight line along the no-reinforced joint between box beam and bales.
Is stucco the only thing that can be used on the outside of a straw bale house? How about wood, bricks, or stone? What about the inside of the house?
JB,
Other finishes are possible on a straw bale home; however, they often require more work than they are worth. For example, adding wood siding would require that the bales be plastered with at least one scratch coat to reduce the fire risk to the bales. In addition, nailers will have to be installed every 16″ to attach the wood siding to. The siding itself increases the risk of moisture damage to the bales so a vented air space is also a good idea between the bales and the siding. All of this is extra work that is otherwise not required if you use plaster. Stone and other masonry products are a bit easier as they can be embedded in the mortar which is placed directly on the bales and no additional nailers or ventilation are required. In general, I find it easiest and most time and cost effective to stick with plaster on both sides of the bales.
Hi Andrew
We have a different kind of crack. There is a crack from the corner of the window ithat is about 12 inches long and not straight. It seems to go through at least the finish and the brown coat. It is on the west facing wall so gets lots of sum and in the winter will get rain against it. I a.m. trying to figure out the best material for repairing it. I am trying to resist caulking it but ai did see that Transmineral has a grout product that might work. I would love to get your advice. Thanks for all you do!
Hi Mary. Bummer!!! It appears to be a finish and brown coat crack? That’s unusual. Anyway, I’m not familiar with the grout you mention from TransMineralUSA. I know they discuss injection grouting on their site, but that’s something different, in my opinion, than what you’re dealing with here. There are a couple ways that I have successfully used for repairing these types of cracks. One is to clean the crack out with a putty knife and air gun and then to apply a direct lime plaster fill in the crack with a wide nozzle syringe. That way you don’t get a lot of the surface of the wall and it doesn’t require a full skim coat to hide the burn marks of the patch. It’s tricky to do well, but can be a good fix for that type of crack.
Another option is to use a sanded, color matched caulking. You can typically get those custom colored at a tile store. The sand helps it look more like the plaster. The flexibility of the caulking helps it maintain the seal moving forward, even if the western sun does wreak havoc on that wall and the crack itself.
I sure hope that one of the three options (yours plus my two) works for you! Lots of love and say hi to John for me.
I am getting ready to try and repair cracks in my lime plaster that were probably caused by foundation settling or load bearing wall settling. The strawbale house is twenty years old.and the hairline cracks have grown over the years to 1/4 ” in some places. I have shored up the post foundation and am trying to get on the plastering before it gets cold here in the Appalachians. Thinking of opening up the cracks with a V groove, patching, and then a new finish coat. Any thoughts or tips? I want to do this the best I can. Can I send you pictures? I have high calcium lime putty soaking for a few weeks now.
Hi Alex. It seems like you are on the right path for your repair. I would only add to confirm the material you are patching with is compatible with the material already on the wall. Wishing you success.
Hi Andrew,
I hope you’re still open to questions via this forum. I completed my external lime render in December 2018. Since then I’ve had problems with fine cracking on all windows facing west which cops intense winds and rain. I did coat the wall with siloxane so I think the wind rather than the rain is the real perpetrator along with possibly the quick drying of the 3rd coat on application in the summer heat.
Now I have cracking on the three house corners that are rendered, at the top where they meet the roof. Each piece of render cracks about the size of 60mm x 40mm in a semi circle from the top.
Any idea if this is caused by movement of the house (which is super solid) and how to repair this so it doesn’t happen again? I was thinking of 3-4 layers of render, the last two with mesh.
Thanks very much for the wealth of info you provide.
Hi Gail. Sorry to hear about your challenges with the plaster. It does sound like there are some issues in play. It’s possible that the plaster dried too fast during application and so lost it’s strength. If the water is sucked into the previous coat (no water applied to walls the night before plastering as well as the morning of), the lime crystals cannot grow properly and the plaster will be weakened. There may be structural issues at play as well in the areas of transition to the roof and/or at the corners. Did you have three coats of lime plaster or did you use earthen plaster beneath the finish coat of lime? Di you use lath and or mesh on the bales, especially at the corners and transitions?
When should I worry about cracks on internal walls
Hi Cheryl,
Cracks in internal straw bale walls can be a concern, but not all cracks are created equal. Let us break it down:
In summary, cracks in internal straw bale walls can be worrisome, but they’re not always a cause for alarm. Understanding the context, regularly inspecting your walls, and addressing issues promptly can help ensure the longevity and stability of your straw bale construction.