Is it better to spray or hand-apply plaster in strawbale building?
In regards to the question “is it better to spray or hand plaster?”, there are several schools of thought. Some people believe that plastering by hand is better because the force of the application is higher when arm power is used to press the plaster into the bales, giving it a high level of “key” or adhesion. Others believe that the force applied by the spraying is actually better because it shoots the plaster deep into the webbing of the straw. I have discussed this question at length with several master plasterers over the years and have learned a lot about both processes. The fact of the matter is that both systems are absolutely acceptable as long as certain details are maintained.
For example, a scratch coat of NHL 5 could be applied 2:1 followed by a brown coat of NHL 5 applied 2.5:1 and finished with a coat of NHL 3.5 at 2:1. This is because the 3.5 is a weaker lime than the 5. Plaster should ALWAYS get weaker as it “comes off the wall.” In other words, the coats further from the straw should be weaker than those beneath them. This is an industry standard.
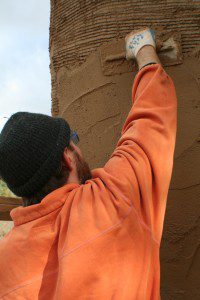
I’ll discuss hand application first. Muscle is perhaps the most important part of hand application. If the plaster is not properly worked into the substrate (straw in this case) it will not anchor properly or achieve the right key/tooth. If the plaster is not properly anchored, then even if it hardens perfectly, it is hardening AWAY from the wall surface and thus is prone to full delimitation (where it peels away from the wall).
Delamination can also be caused by the walls not being properly prepped. For example, if loose straw remains on the wall and no meshing system is in place, that loose straw can peel away from the wall with the plaster attached to it: thus delaminating. I should mention that this is true for both hand and spray applications.
The next important detail is often referred to as “put it on the wall and leave it alone.” What that means is that if the plaster is overworked with the trowel, it will start to separate. The creamier aspects of the mix, the lime, will be pulled from the aggregate, the sand, and left at the surface. When the plaster dries/cures, this material will dust off of the wall and the remaining sand will be weak because the binder (the lime) has dusted off, leaving the sand to bind itself, something it cannot do. The best hand application is one that is done with minimal “extra” working of the mud once it is placed on the wall.
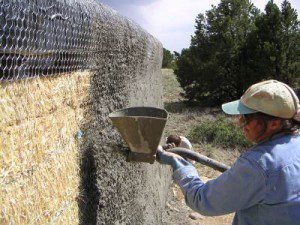
Spraying plaster, as mentioned above, is just as viable an option as hand application. The biggest mistake that people make when spraying plaster is they water it down under the assumption that it needs to be “lighter” in order to be sprayed. This is 100% incorrect and when done, has a very negative affect on the plaster. The more water there is in a plaster, the more room for voids in the curing process.
Keep in mind that as plaster dries and cures, the water molecules (H2O) are driven off leaving voids behind. The lime crystals need to grow into those voids in order to create a strong plaster. If the voids are bigger than the crystals can fill during the curing period, the walls will end up weak. Plaster should therefore be sprayed at the same consistency as it would be hand applied. Exactly how much water needs to be added varies with each load as the sand for plaster is often supplied in bulk with varying amounts of water within it. Therefore it is crucial that the plasterers keep a watchful eye on the mix as it is created to ensure that just enough water is used in each batch.
As with hand applied plaster, the concept of overworking sprayed plaster should be managed as well. Spray it, press it into position with a trowel and then leave it alone. One MUST follow up sprayed plaster with a trowel immediately after it is sprayed to smooth out big irregularities of thickness on the surface and make sure the key with the straw is achieved.
A step that is often missed in lime plaster application is “pressing back.” This is when a trowel is held vertically against the wall and drawn up and/or down over the plaster with adequate force to push the plaster back into the wall. This is only done after the scratch coat and should be completed when the plaster reaches a “leathery” feel. Too soon and the plaster will simply squish around. Too late and the plaster will be too hard to compress.
The purpose of this step is two fold. First, it compresses the plaster onto itself, tightening up any voids in the plaster as mentioned earlier. Secondly, it creates an even stronger key/tooth with the straw. Once the pressing back is complete, the scratching should take place immediately leaving marks roughly 1/4″ wide by 1/8″ – 1/4″ deep. Any deeper and the plaster will slump on itself. Any shallower and the brown coat will not have enough tooth to properly attach. The scratches should be made with a scarifier or other tool designed for this specific purpose. Make shift scratching devices often pull mud from the wall or create inadequate scratch patterns. The scratching should be run horizontally as much as possible.
After the scratch coat is complete, it is vital that the walls be kept damp, or misted, for at least the first 3 days. The curing time between coats is a minimum of 10 days and if misting can be done for the entire 10 days, even better. This slows the curing process and allows the plaster to grow into the voids as discussed earlier. Failure to wait the 10 days can cause a weak plaster. Before the application of the next coat it is vital to pre-wet the walls. The night before the second coat’s application, the walls should be completely dampened. The morning of application, they should be misted once again.
Failure to fully saturate the walls the night prior will give you a “snap, crackle, pop” effect on the plaster. You will literally be able to hear the prior coat of plaster sucking the moisture out of the new coat. This rapid reduction in moisture ruins the fresh coat of plaster which will likely result in delimitation or chalking of the coat. This dampening MUST happen between both the first/second coat and the second/third coat for proper plaster application. The 10 day cure time and misting must happen after the scratch and brown coats, but not after the final coat as misting of the final coat can cause color to run. Furthermore, the final coat is applied very thin and as such will dry/cure fast enough that misting would have little effect on it.
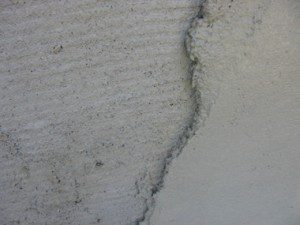
The brown coat does not receive the pressing back like the scratch coat. Instead, it is burnished with a “devil float” or some other float in a circular form to 1) compress the plaster onto itself and 2) press the plaster into the tooth created by the scratching tool. The final result will be a rough, swirly coat. This is vital to the final coat’s ability to hang onto the scratch/brown below it. If the brown coat is smoothed out, the finish coat will fail and delaminate.
There are so many details to a quality plaster job and so many places to make mistakes. The real question may not be whether to spray or to apply by hand, but rather, what steps need to be taken, no matter which application method is chosen, such that the plaster job will be successful. I strongly recommend learning to plaster on a small project before you decide to tackle your own home. Consider taking a workshop with me to get your hands dirty, literally, or at very least, check out my instructional plastering video as part of our How-To Video Series. Over 10.5 hours of professional grade instruction for only $40, delivered immediately to your inbox. Plastering is hard work and takes skill. It’s also what people notice the most about a home when it’s complete. Take the time to learn the process and you will have success.



7 Responses
I learned so much reading this post on plaster. We are building a straw bale house right now, and I know your video will prove useful.
Getting the word out about alternate, more sustainable building techniques is really important. Thank you.
Couldn’t have said it better myself – very useful and comforting to know I’m on the right path. Thanks a lot for the information. I’m using a stucco sprayer like the one pictured and it’s so fast but a bit messy but for large walls it’s great. Up high or in tight spots I do it by hand. As you say both have their uses. One tip I’d have would be to watch the weather – if there’s warm weather coming prepare to render inside (in the shade) – slower curing time, if there’s a cool spell coming then try to render outside (cloud is good) – slower curing time and maximizes you wet edge time. Great stuff, well done!
Good point Mike. I love even a small amount of misty rain when plastering! I didn’t mention the importance of keeping your render/plaster out of direct sun and wind. It’s really important to plaster in the shade (tarps hung from the roof eave for example) to keep a slow cure and a wet edge. Direct sun or wind will make everything harder.
Andrew,
Thankls for this informative article. I have one question though. If I was to plaster using a clay/straw/sand mix without lime, would the “put it on the wall leave it alone” rule still apply? or is this not an issue if I am not using lime in the mix? I am hoping that I can work the clay as much as I want in order to get the finish quality I want since I tend to work slow (inexperienced).
Hi Graham. It is less of an issue as clay is very forgiving and can worked longer; however, any time you work a material that has water, fines, binders, and coarse material the working will start to separate those materials. That’s what gives the smoother finish when working the material longer: the fines are coming to the surface and leaving the rougher material’behind” in the plaster base. So, yes, you can work it to get the finish you want, but don’t go crazy with it either.
Andrew,
Have you looked into this new product as possibly a more economical replacement for natural hydraulic lime. Thanks and hope you’re doing well.
P.S. Still have fond memories of the Ferncliff workshop.
http://limestrongfinish.com/
I have not used it so I’m no expert on the topic. That said, I prefer naturally occurring hydraulic lime plaster opposed to a lime plaster with added pozzolans. I find the quality is, in general, much better. Again, I don’t have a direct comparison with this particular product.