Let’s start with the obvious: rain. This is perhaps the easiest form of water to deal with in a straw bale home. Large overhangs, preferably 2′ or more, will direct the majority of the rain away from the walls by protecting them from direct contact. With the application of gutters on the eaves, you can virtually eliminate rain from contacting the walls. The gutters also give you the opportunity to collect your rainwater for future use. If you have a multiple-story building, be sure to add roof lines at each story. Intermediate roof lines serve the same purpose of directing rain away from the walls. Without them, the roof on the second story will not provide enough protection for the first story. Areas with high wind-driven rain or horizontal rain are a different situation and are harder to build straw bale homes in.
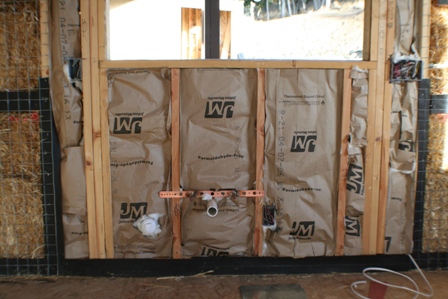
Pipe leaks are another common place of water damage in straw bale homes. These are also easy to deal with. KEEP ALL PLUMBING OUT OF THE BALE WALLS. Sorry to yell, but that needs to be heard. I keep all of my plumbing to interior walls where possible. If that is not possible, I build what I call water isolation walls, like in the example above.
By stopping the bales before we encounter plumbing, we are able to isolate it entirely from the bale walls. The area where the plumbing has to be on an outside wall, like a kitchen sink, can then be insulated with extra insulation, and the wall framed out to meet the same plane as the face of the bales. This eliminates any risk of the water leaking directly into the bales. The 3 1/2″ toe ups also eliminate the risk of the bales soaking the water off the floor from a broken water line.
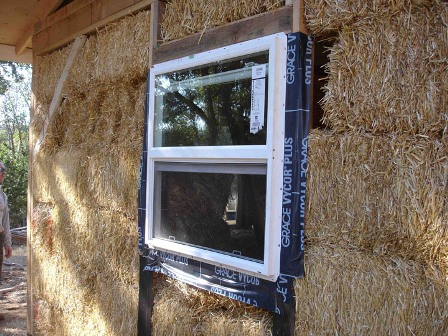
Although I look a little crazy in this shot, I am just fine. (Thanks for your concern, though) I am pointing out the tiny corner detail in the first piece of counter flashing. Notice that the piece that is cut is not cut all the way to the corner. It has a little extra flap that is folded into the window on top of the sill. When covered by the next level of counterflashing, this piece creates a total seal in the corner. A small bead of silicone caulk can be a friend here as well. Check out the next shot:
The sill and legs of the window frame have been completely counterflashed, and THEN the window is installed. Once the window is set, then it is time to go back and flash the window in its entirety, including the head, which is left out of the counterflashing. This extra step is worth the effort. Windows are notorious for leaks and are certainly a place you want to spend some extra time protecting.
Now, the hard one: humidity. The reality is that humidity cannot be stopped. It can be drawn out of the air with dehumidifiers but cannot be eliminated. If you live in a high-humidity area, straw bale construction is probably not a good idea. If you live in a climate where the humidity gives way to hot and dry days for an extended period of time, that may be enough for the bales to dry out. The deal is that humidity pervades everything and cannot be adequately controlled.
If the bales reach a moisture content by volume of over 20%, then they will sustain mold growth and will rot. Exactly how the relative humidity rating of the air translates into moisture content by volume per bale is not clearly defined, at least not to me. If you consider your climate tropical, I would say no to straw bale construction. If you are right on the edge and unsure, I suggest you build a small structure first and install moisture meters to monitor the moisture content. After a year or so, you will have sufficient data to make a more informed decision.

