Strengthen Your Walls with a Tight Top Course

Written By Andrew Morrison
August 23, 2010

two men cutting a straw baleThe stronger your wall, the better. That seems obvious, yet I see house after house where the walls are loose and poorly stacked. Many people don’t reinforce their walls with mesh, choosing instead to plaster directly on the bales. That’s another topic for sure, but it comes back to a simple point: you MUST have strong and stable walls, especially if you don’t reinforce them in some way. Otherwise, you have a loose stack of straw bales waiting to fall over.

There are several steps to consider when creating a strong and stable wall. I’ll list them and then focus on one important aspect. I could write a full article on each aspect outlined below, so please don’t underestimate the importance of each.

1. Start with good quality bales. I can’t say that enough. It will get more and more obvious the further into your job you go.
2. Notch your bales tight to the posts without being too tight. Trying to get too tight will leave you with bales that don’t fully fit around the posts due to folded straw.
3. Be sure that your retied bales are tight. Use the miller’s knot to make sure your bales are as tight as can be.
4. Stack in running bond whenever possible.
5. Intertie corners of adjacent walls.
6. Keep full bales in the corners and keep small, filler pieces away from the corner.
7. Make sure your walls are plumb.
8. Calculate your wall heights during framing to match your bale heights. There is an important detail here I’ll discuss later.
9. Frame a backer board to bale to at the top of the wall.
10. Use welded wire mesh to resist out-of-plane and in-plane loads.

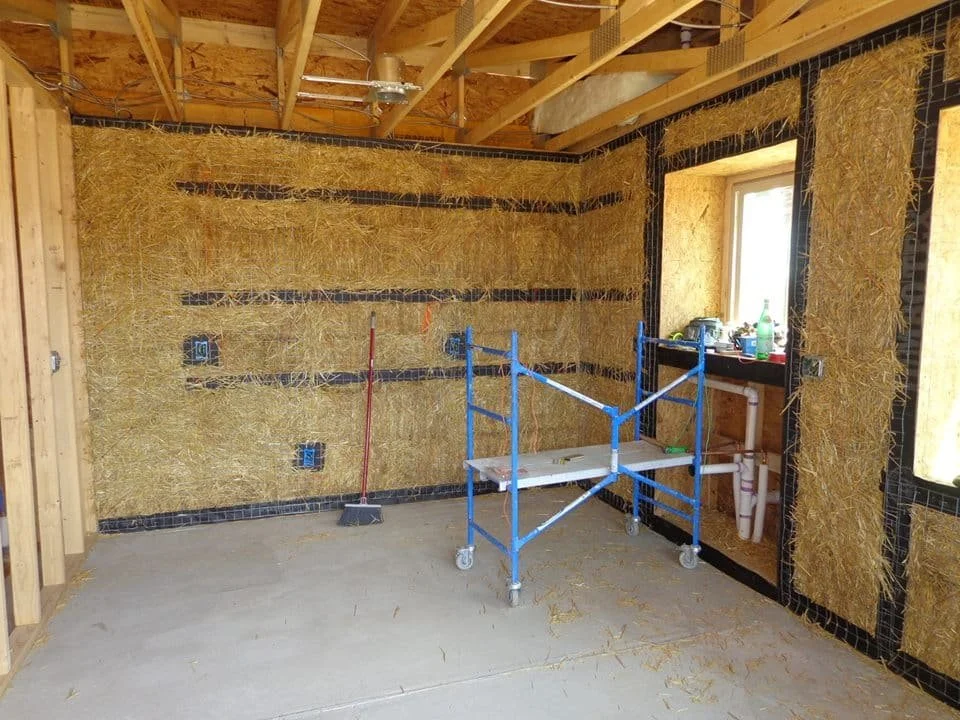
Okay, so let’s focus on number 8 from the list above. The rest are equally as important, but this is what we’re going to discus today. When you calculate your wall heights for framing, be sure to take into account a level of bale compression. For quality bales (which of course you have due to item number 1 in the list) I typically subtract 1-2″ from thew over all wall height. It looks like this:

Add 3 1/2″ toe up plus 7 courses of bales at 14″ tall each minus 2″ for compression. That gives you your height for the top of your wall/bottom of your floor above (or rafters). As number 9 states, then frame in a backer board on the bottom of the floor joists or rafters to press your bales against. This is typically a piece of 1/2″ plywood nailed to the joists with a 2×4 nailer on the face of the bale plane to attach our mesh to. Overall, we’re left with 2 1/2″ of compression to make our last bale course fit.

two men cutting a straw baleThat may not sound like a lot; however, with quality bales, there is not a lot of room in a wall to compress the bales. This means getting the bales to actually fit into the wall is a challenge. There are some hi-tech ways to make it work: using a car jack or two for example; however, the fastest and easiest way is to use a small sheet of Masonite. This roughly 1/4″ thick hard board is very slippery and allows the bales to slide easily into position.

Simply place a piece on top of your second to last course, wedge the final bale into place, and then kick the pants off of it! It helps to leave out the second to last course bales in front of your path and then infill as you build. In other words, bale the last two courses together, don’t try and do the final course after the second to last course is already complete.

There’s nothing like the strength of your legs to get this job done. Trying to bash the bales into place with a tamper is not easy. Use your big muscles or the big muscles of a friend to accomplish this task! In a pinch, if you don’t have access to Masonite, you can use 30 pound roofing felt. It provides adequate slip; however, you can’t pull it out easily once the bale is installed and so it stays in the wall.

This makes for a slippery top course and although does not defeat the purpose, it certainly makes keeping the top bale in place harder. In case that’s not clear…do NOT leave the Masonite in place once the bale has been set. Pull it out and use the same piece for the next bale.

You can get some hands-on practice tightening your walls and have perhaps one of the best weeks of your life in the process by attending one of our workshops. We always have a good time and you will gain the confidence to build your own house too. CLICK HERE to see what workshop locations and dates we have available this year!

IPad displaying man cutting strawbales

16 Essential Steps to Straw Bale Success

FREE 16 Day E-Course

Straw bale workshop participants applying cob plaster

Post Comments

4 Responses

  1. After watching the DVDs and reading the book I am a bit confused about the top course. Should it be stuffed above the posts or should the top bale be either notched to go around the top plate/4×6 beam and the posts (or) cut to 14″ or so wide and slipped in as shown in the picture in this post. I like the idea of compressing the bales.

    1. Sorry about the confusion. There are several ways to finish off the top of the wall and each decision is based on the site conditions so it’s not as easy as to say “so it this way.” The goal is ALWAYS to get the best compression you can, so whichever method makes that easiest is the one to choose. If the building is framed properly, you will end up with a top bale that does not fit in the space provided by 2″-4″ depending on your bales (2″ is all the compression you’ll get out of rice bales, for example, whereas a wheat bale can usually be squished by 4″, even when they are tight wheat bales). The tighter they fit, the tighter your wall will be and the tighter your wall is the better your overall finish will be.

  2. My walls are not as tight as I’d like. Seemed to have settled over winter. I’ve already attached my 2×2 mesh… am I done for :< ?

    1. Sorry to hear that. The settling is not uncommon when bales are left to sit over winter. If there is a visual gap, then I suggest using spray foam to fill the void. If it’s just that the walls a re looser than they were before the winter, but there are no obvious gaps to be filled, then you can simply plaster the walls and that will tighten things up. Again, be sure there are no gaps that need to be filled with either stuffing or spray foam before you plaster. The good news is…you’re NOT done for. 🙂

Leave a Reply

Your email address will not be published. Required fields are marked *

This site uses Akismet to reduce spam. Learn how your comment data is processed.